让终端更好用
更新: 2/28/2026 字数: 0 字 时长: 0 分钟
macOS 自带的终端应用功能较为基础,推荐使用 iTerm2 作为替代,并配合 Oh My Zsh 来提升终端的使用体验。
1.安装 Homebrew
Homebrew 是 macOS 上非常流行的包管理工具,可以方便地安装和管理各种软件包,执行如下命令,并根据每一步提示操作:
/bin/zsh -c "$(curl -fsSL https://gitee.com/cunkai/HomebrewCN/raw/master/Homebrew.sh)"2.安装 iTerm2
打开默认的终端应用
Terminal,安装包含各种 icon 字符的字体:bashgit clone https://github.com/ryanoasis/nerd-fonts.git --depth 1 cd nerd-fonts # 执行完成后,可以删除该文件夹 ./install.sh安装
iTerm:bashbrew install --cask iterm2为 iTerm 设置完全磁盘访问权限,打开
系统偏好设置 -> 安全性与隐私 -> 隐私 -> 完全磁盘访问权限,点击左下角的锁图标解锁后,添加iTerm2应用。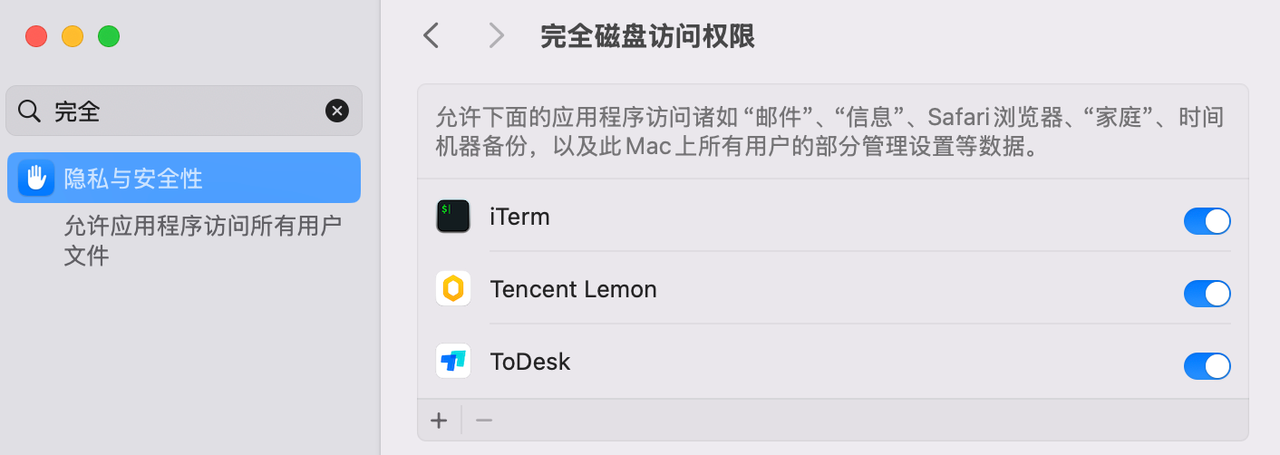
后续命令即可在 iTerm 中执行。
安装 iTerm 主题
Nord(一款冷色调的主题):bashwget https://raw.githubusercontent.com/arcticicestudio/nord-iterm2/develop/src/xml/Nord.itermcolors # 如果没有 wget 命令,则执行命令安装即可 brew install wget打开 iTerm,进入
settings → profiles → colors → color preset → import,选择刚才下载的Nord.itermcolors文件导入,然后再选择Nord主题。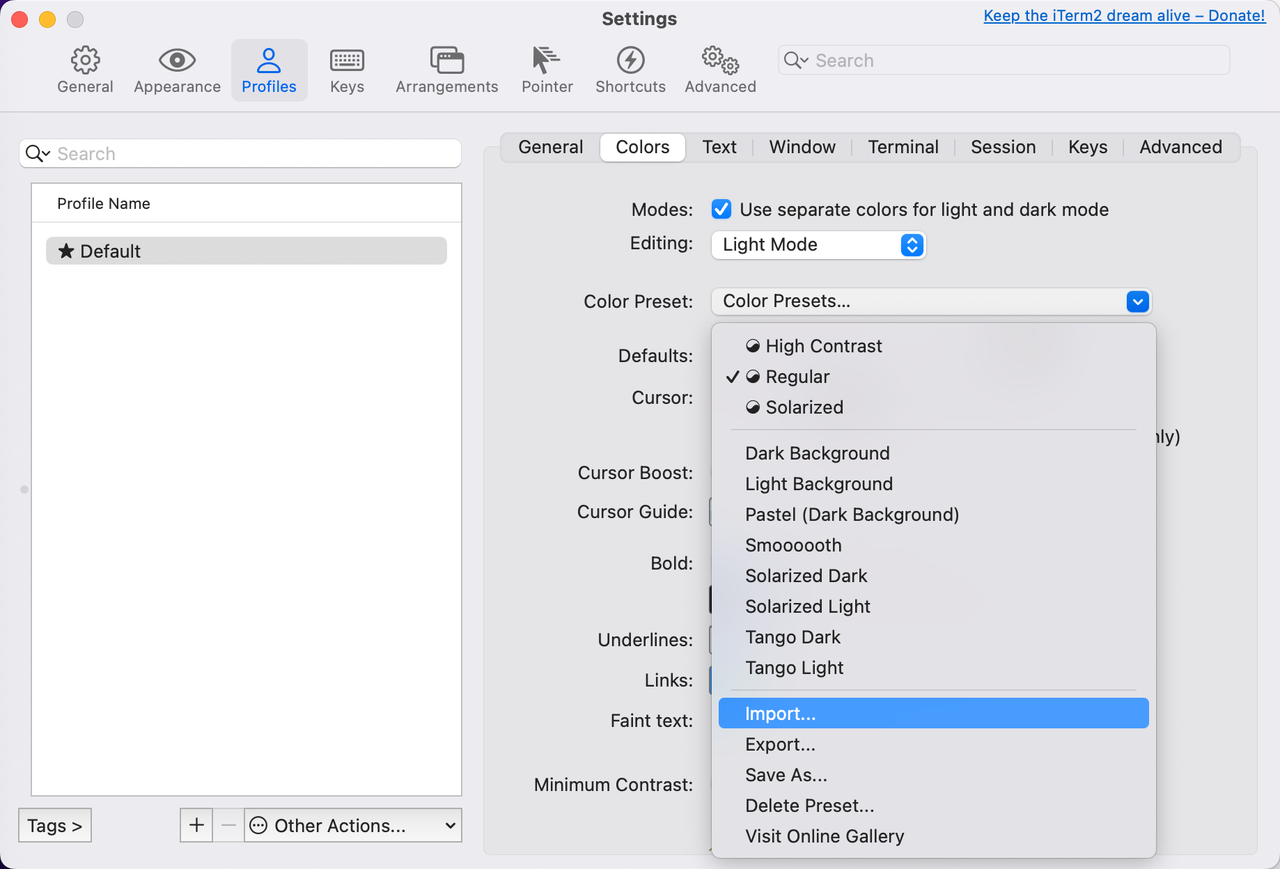
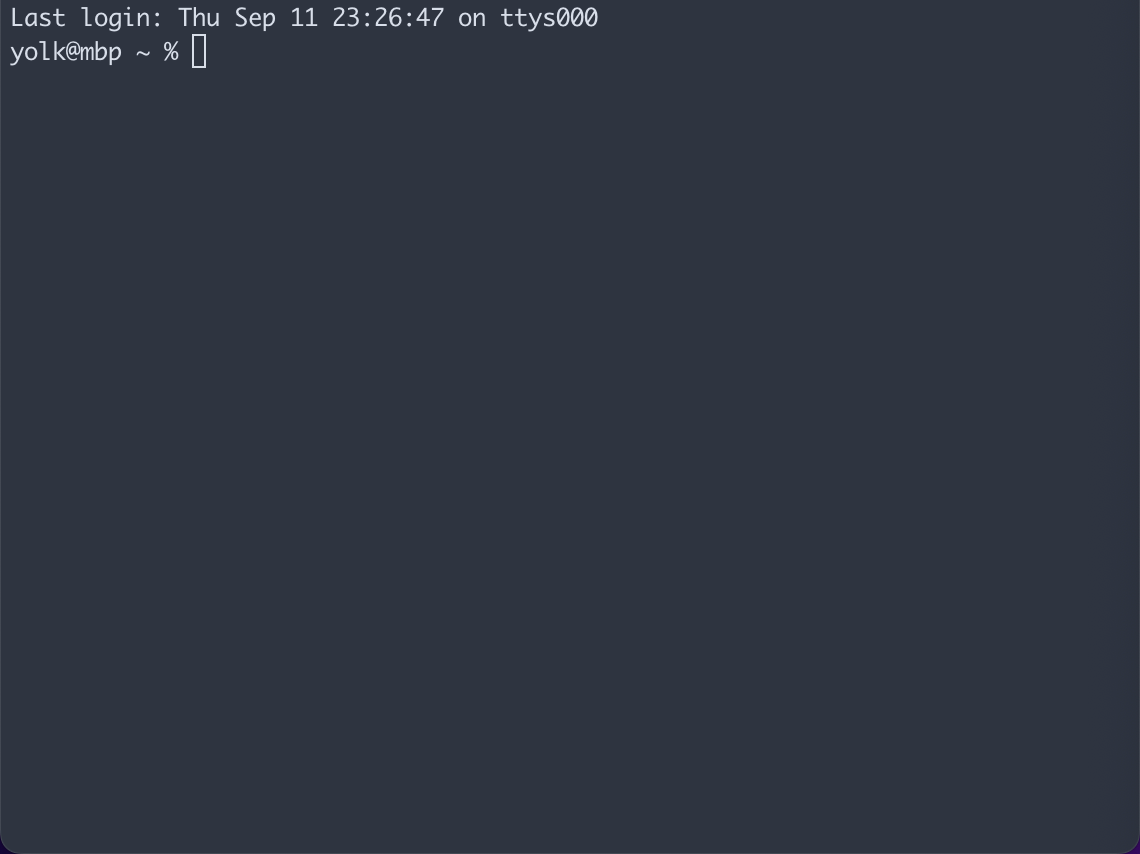
效果展示:
设置光标跳转(可以使用
option + ←和option + →来实现光标按单词快速移动),进入settings → profiles → Keys → Key Bindings → Natural Text Editing: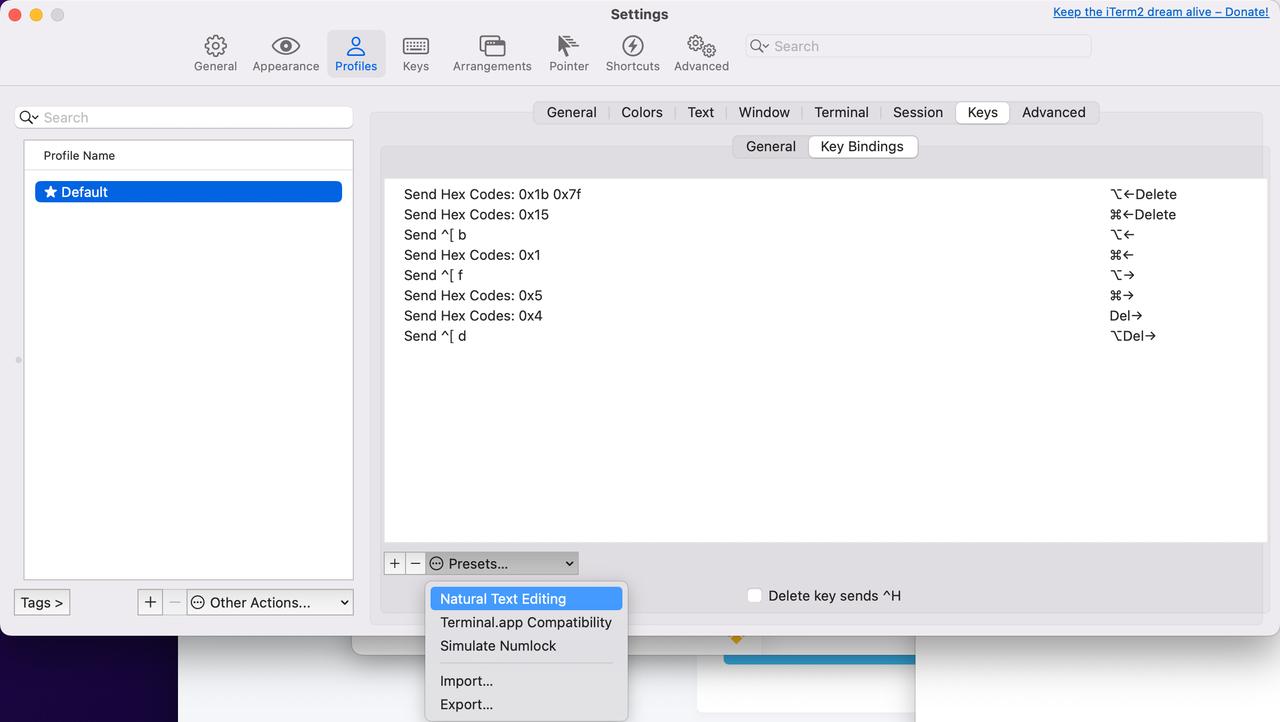
自定义背景,进入
settings → profiles → Window → Background Image,选择一张喜欢的图片作为背景,并调整透明度: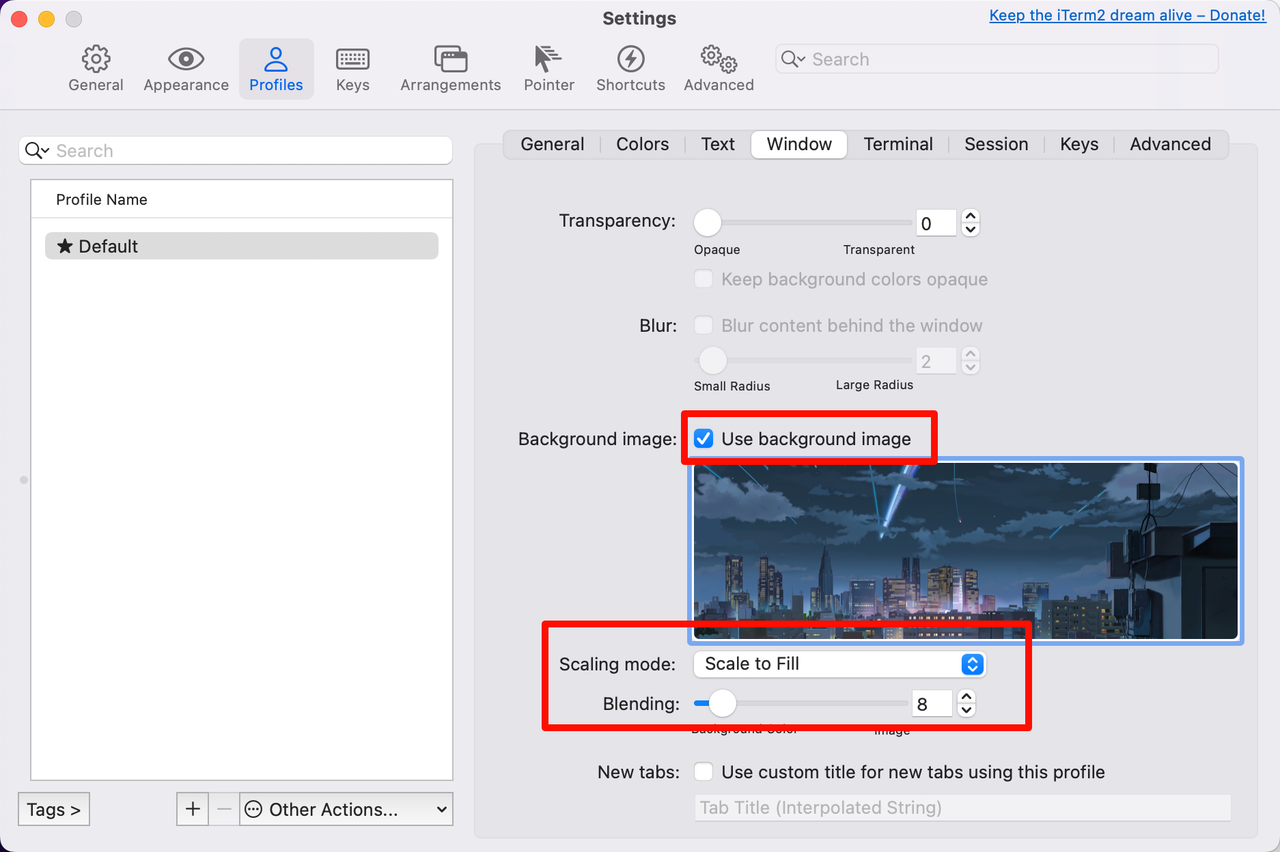
添加会话状态栏,进入
settings → profiles → Session,勾选Status bar enabled,并进行配置: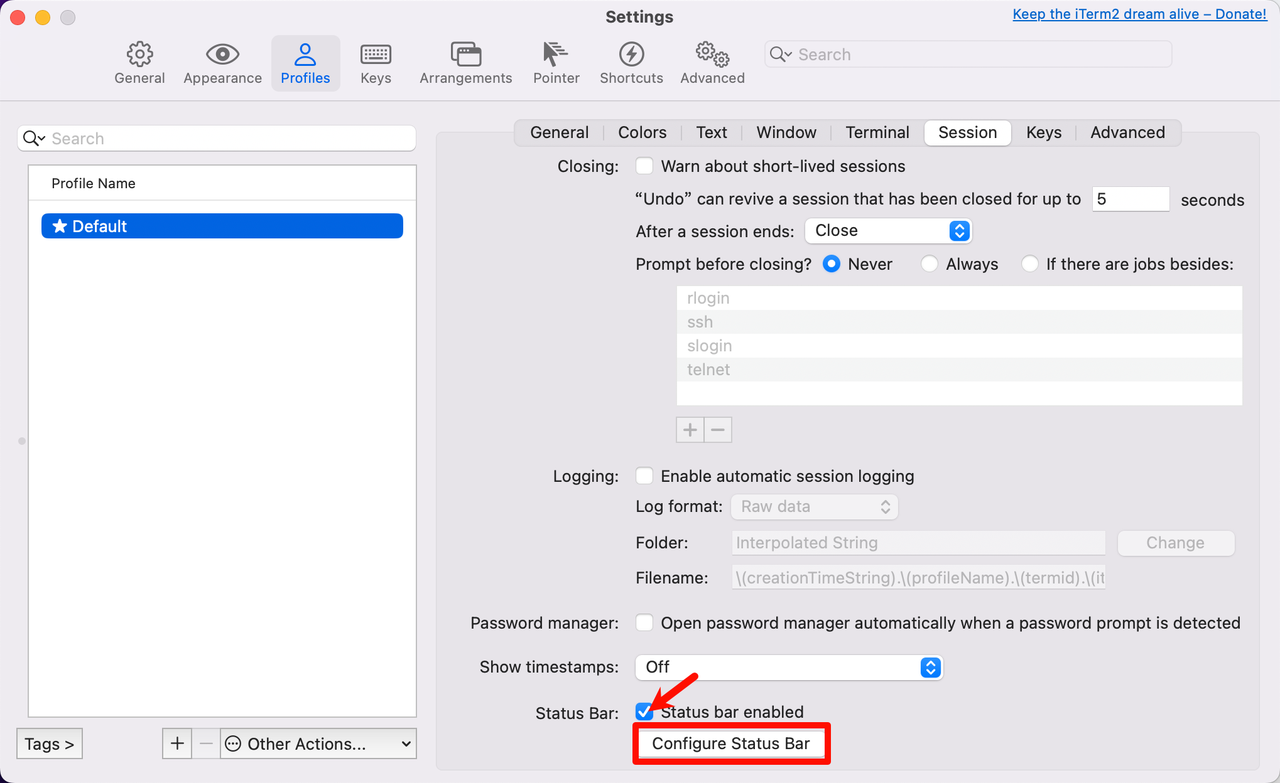
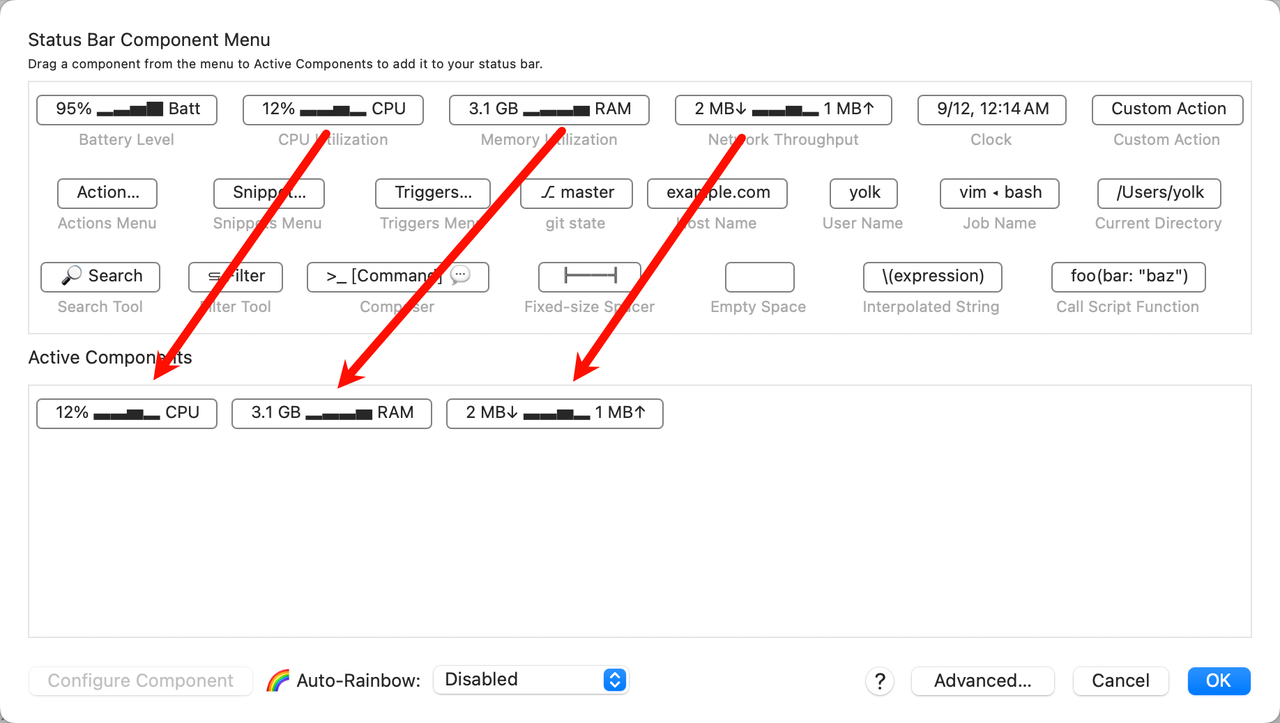
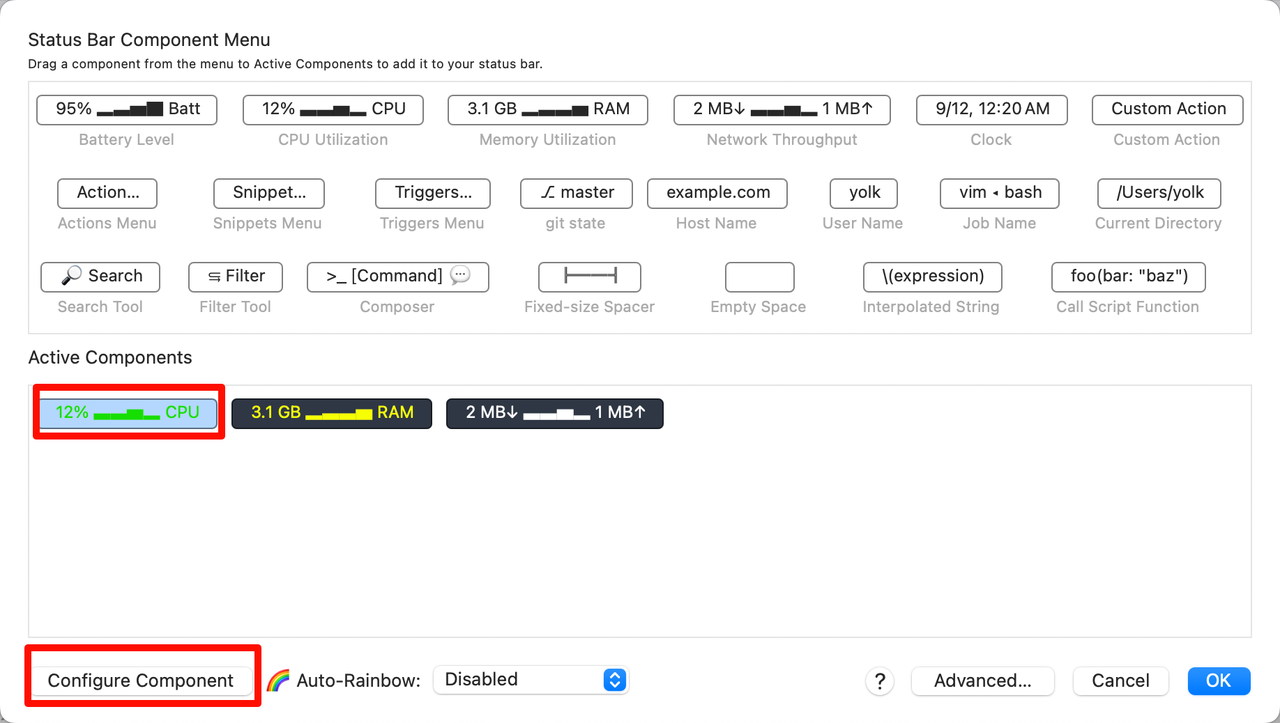
配置每个组件的背景颜色、字体颜色:
plaintextCPU Backgroud Color->sRGB: 2e3440 Text Color->sRGB: 11de00 RAM Backgroud Color->sRGB: 2e3440 Text Color->sRGB: f6ff04 网络 Backgroud Color->sRGB: 2e3440 Text Color->sRGB: feffff Download Color->sRGB: fa0000 Upload Color->sRGB: 11de00更改字体大小和样式,进入
settings → profiles → Text: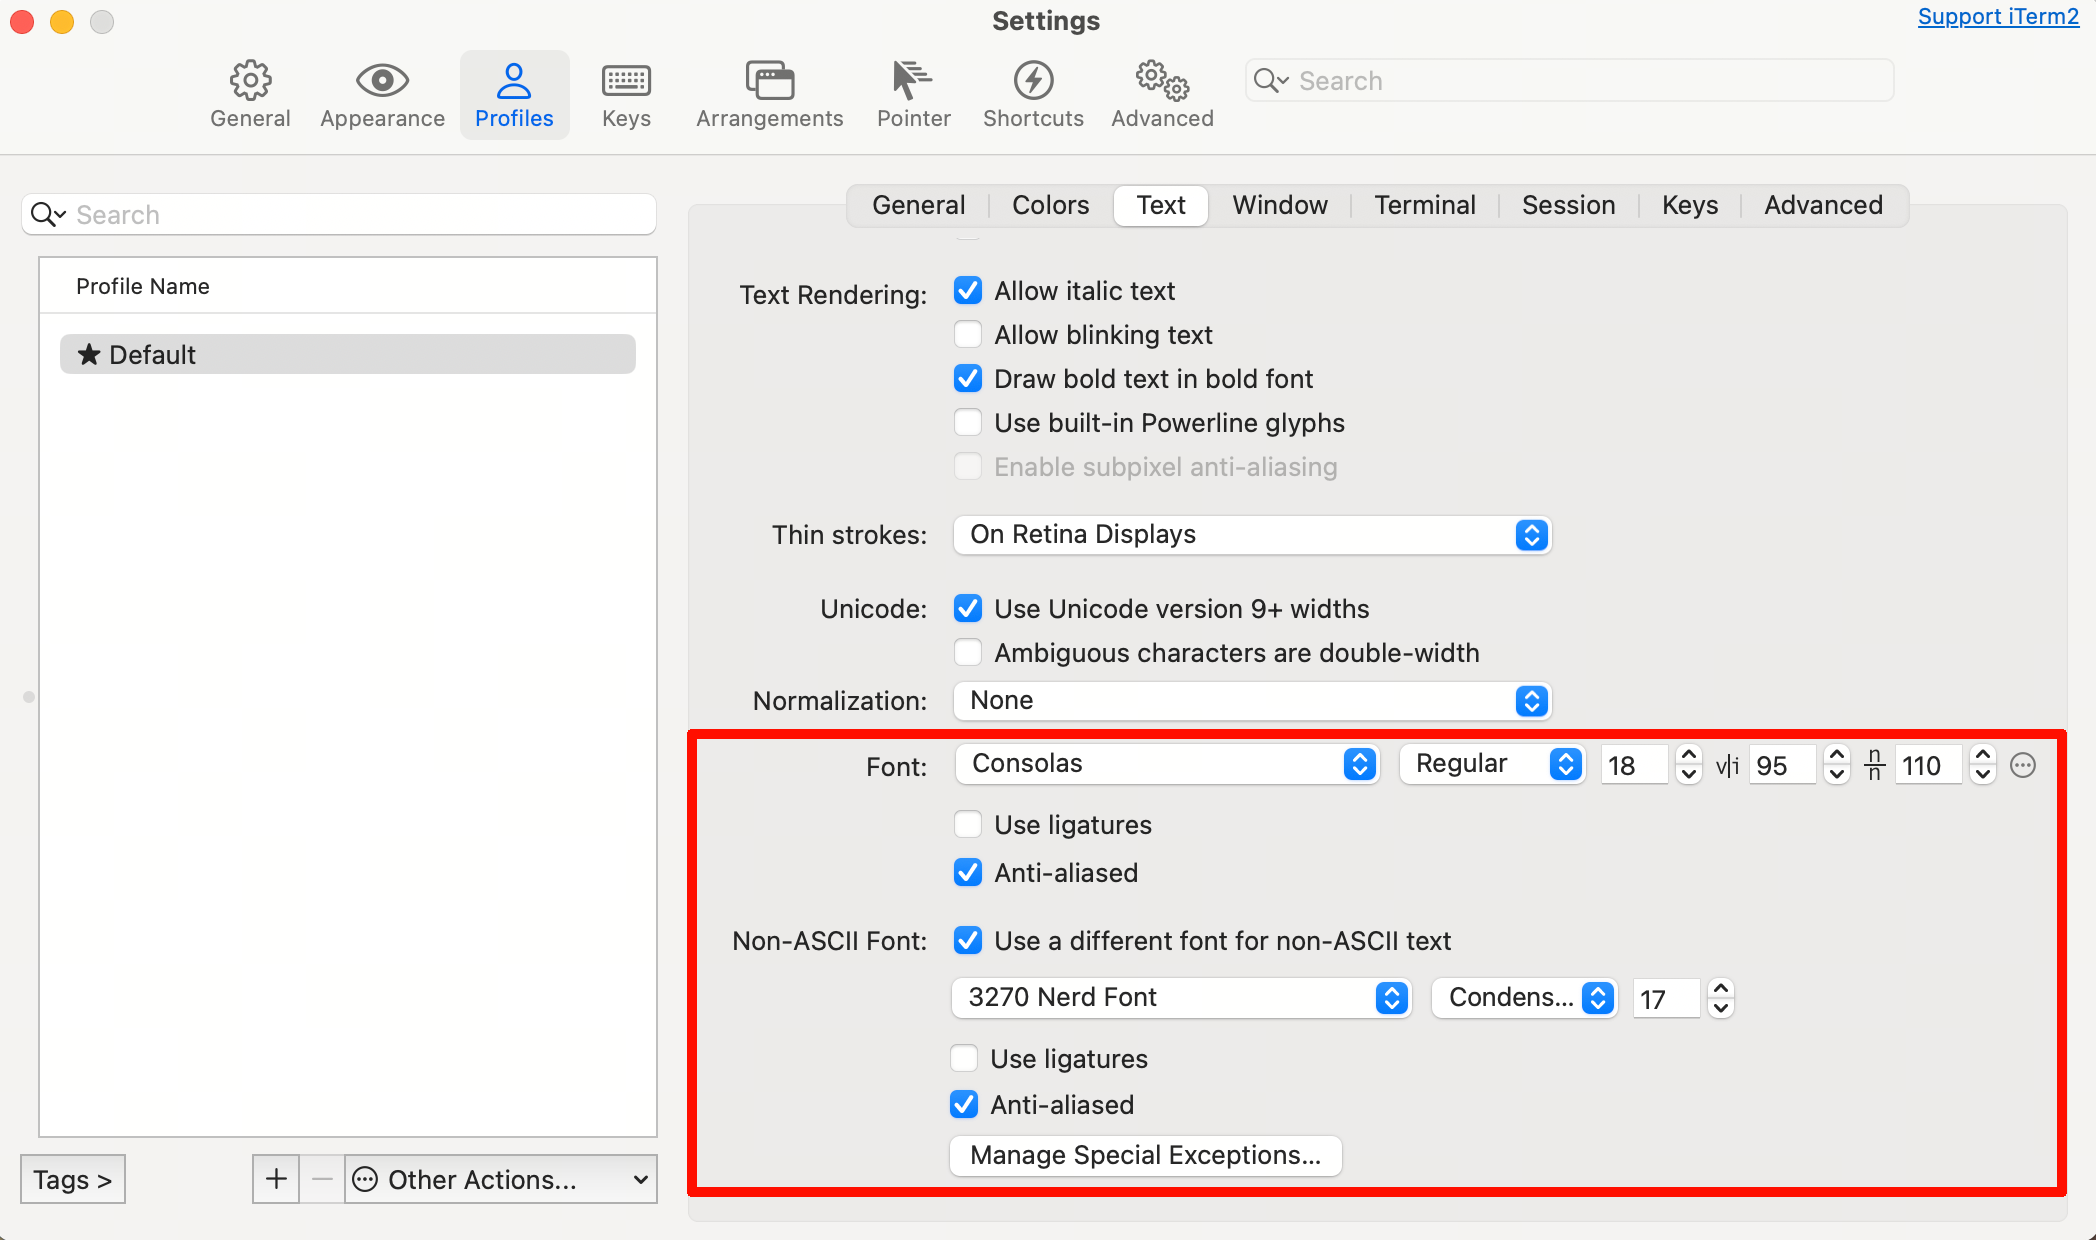
我这里使用的
Consolas会有样式问题, 建议字体使用JetBrainsMono Nerd Font剩余配置保持一致即可。

iterm2 配置
rz、sz(与服务器传输文件):新建文件iterm2-recv-zmodem.sh,内容如下:
bash#!/bin/bash # Author: Matt Mastracci (matthew@mastracci.com) # AppleScript from http://stackoverflow.com/questions/4309087/cancel-button-on-osascript-in-a-bash-script # licensed under cc-wiki with attribution required # Remainder of script public domain osascript -e 'tell application "iTerm2" to version' > /dev/null 2>&1 && NAME=iTerm2 || NAME=iTerm if [[ $NAME = "iTerm" ]]; then FILE=`osascript -e 'tell application "iTerm" to activate' -e 'tell application "iTerm" to set thefile to choose folder with prompt "Choose a folder to place received files in"' -e "do shell script (\"echo \"&(quoted form of POSIX path of thefile as Unicode text)&\"\")"` else FILE=`osascript -e 'tell application "iTerm2" to activate' -e 'tell application "iTerm2" to set thefile to choose folder with prompt "Choose a folder to place received files in"' -e "do shell script (\"echo \"&(quoted form of POSIX path of thefile as Unicode text)&\"\")"` fi if [[ $FILE = "" ]]; then echo Cancelled. # Send ZModem cancel echo -e \\x18\\x18\\x18\\x18\\x18 sleep 1 echo echo \# Cancelled transfer else cd "$FILE" # 使用 which rz 查看位置 /opt/homebrew/bin/rz -E -e -b sleep 1 echo echo echo \# Sent \-\> $FILE fi新建文件iterm2-send-zmodem.sh,内容如下:
bash#!/bin/bash # Author: Matt Mastracci (matthew@mastracci.com) # AppleScript from http://stackoverflow.com/questions/4309087/cancel-button-on-osascript-in-a-bash-script # licensed under cc-wiki with attribution required # Remainder of script public domain osascript -e 'tell application "iTerm2" to version' > /dev/null 2>&1 && NAME=iTerm2 || NAME=iTerm if [[ $NAME = "iTerm" ]]; then FILE=`osascript -e 'tell application "iTerm" to activate' -e 'tell application "iTerm" to set thefile to choose file with prompt "Choose a file to send"' -e "do shell script (\"echo \"&(quoted form of POSIX path of thefile as Unicode text)&\"\")"` else FILE=`osascript -e 'tell application "iTerm2" to activate' -e 'tell application "iTerm2" to set thefile to choose file with prompt "Choose a file to send"' -e "do shell script (\"echo \"&(quoted form of POSIX path of thefile as Unicode text)&\"\")"` fi if [[ $FILE = "" ]]; then echo Cancelled. # Send ZModem cancel echo -e \\x18\\x18\\x18\\x18\\x18 sleep 1 echo echo \# Cancelled transfer else # 使用 which sz 查看位置 /opt/homebrew/bin/sz "$FILE" -e -b sleep 1 echo echo \# Received $FILE fi赋予脚本可执行权限:
bashchmod +x iterm2-recv-zmodem.sh chmod +x iterm2-send-zmodem.sh打开 iTerm,进入
Settings -> Perference-> Profiles -> Default -> Advanced -> Triggers,添加如下两条 Trigger: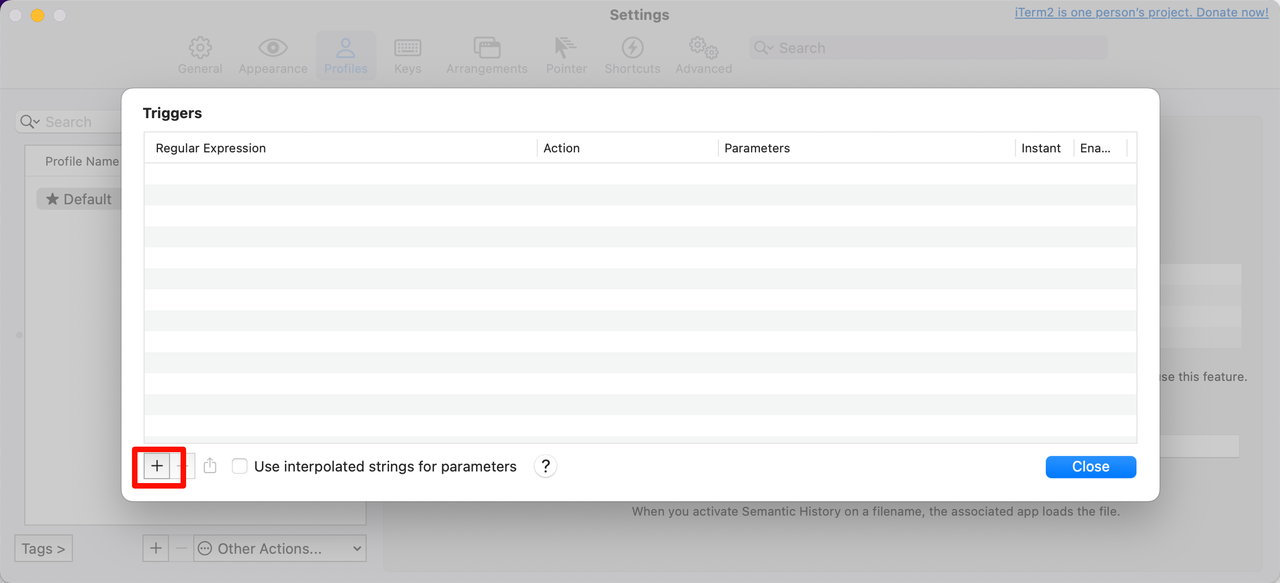
 plaintext
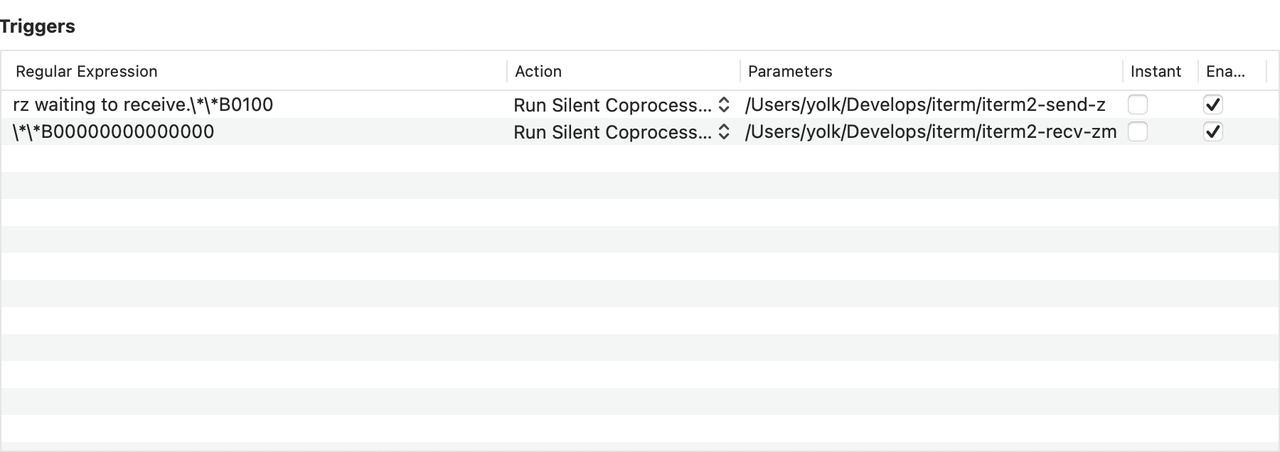
Regular expression: rz waiting to receive.\*\*B0100
Action: Run Silent Coprocess
Parameters: iterm2-send-zmodem.sh 脚本位置

Regular expression: \*\*B00000000000000
Action: Run Silent Coprocess
Parameters: iterm2-recv-zmodem.sh 脚本位置
2.安装 Oh My Zsh
安装
Oh My Zsh:bashsh -c "$(curl -fsSL https://raw.githubusercontent.com/ohmyzsh/ohmyzsh/master/tools/install.sh)"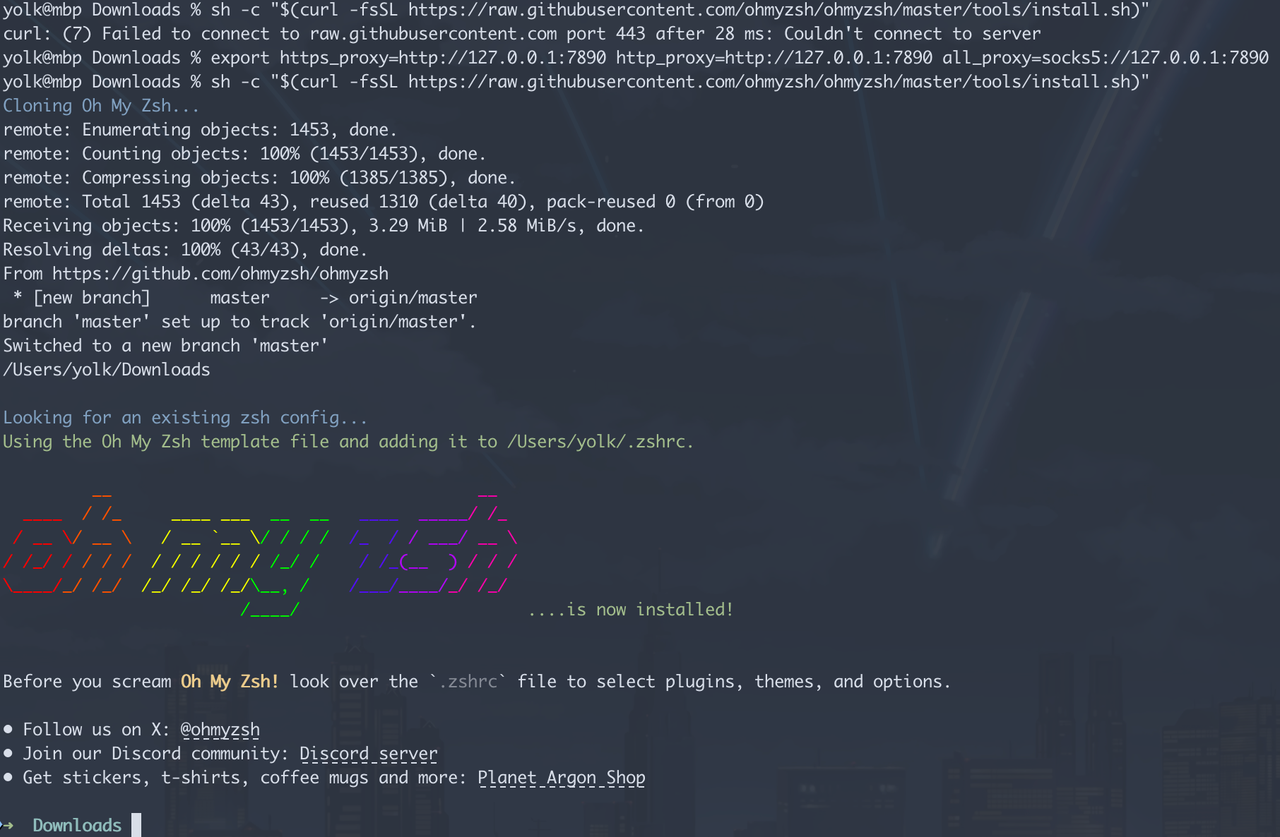
安装插件:
bash// 命令补全 git clone https://github.com/zsh-users/zsh-autosuggestions ${ZSH_CUSTOM:-~/.oh-my-zsh/custom}/plugins/zsh-autosuggestions // 高亮 git clone https://github.com/zsh-users/zsh-syntax-highlighting.git ${ZSH_CUSTOM:-~/.oh-my-zsh/custom}/plugins/zsh-syntax-highlighting // 在git项目文件夹里面使用 git open 命令即可在浏览器打开仓库 git clone https://github.com/paulirish/git-open.git ${ZSH_CUSTOM:-~/.oh-my-zsh/custom}/plugins/git-open // 如果执行的命令存在别名,会自动提示推荐使用的别名; git clone https://github.com/MichaelAquilina/zsh-you-should-use.git ${ZSH_CUSTOM:-~/.oh-my-zsh/custom}/plugins/you-should-use配置插件,执行命令
vim ~/.zshrc,找到plugins=(git),修改为:bash# 除上述下载的,也包含自带的 plugins=( git gitignore zsh-autosuggestions zsh-syntax-highlighting git-open you-should-use extract themes copypath copyfile z ) # git: git各种操作设置了别名,更方便使用 # gitignore: 提供一条 gi 命令,用来查询 gitignore 模板,用法: gi python,可以接着跟"> .gitignore"输出到文件 # extract: 使用 x 命令即可解压文件 # copypath: 用来 copy 路径的,命令格式 copypath <文件或目录> # copyfile: 用于 copy 文件内容,命令格式 copyfile <文件路径> # z: 此记住了你在命令行中跳转过的每个路径,并且记录了每个路径的访问次数,命令格式 z xxx # themes: 提供一条 theme 命令,用来随时手动切换主题。不需要一直改 .zshrc编辑保存后,执行命令
source ~/.zshrc使配置生效。配置主题,可以修改
~/.zshrc中的ZSH_THEME变量,主题清单可以访问此仓库编辑保存后,执行命令
source ~/.zshrc使配置生效。如果 iTerm 启动时出现的
Last Login信息,想要去掉,可以在~/.zshrc文件末尾添加如下配置:bash# 去掉 Last login 信息 touch ~/.hushlogin编辑保存后,执行命令
source ~/.zshrc使配置生效。上面安装了
git-open插件,也可以在~/.zshrc文件中为其添加gop别名,方便使用:bashalias gop='git open'编辑保存后,执行命令
source ~/.zshrc使配置生效。最后给出我的
.zshrc文件内容:bashexport ZSH="$HOME/.oh-my-zsh" ZSH_THEME="gentoo" zstyle ':omz:plugins:nvm' lazy yes zstyle ':omz:plugins:nvm' autoload yes zstyle ':omz:plugins:nvm' silent-autoload yes plugins=( nvm git gitignore zsh-autosuggestions zsh-syntax-highlighting git-open you-should-use extract themes copypath copyfile z ) source $ZSH/oh-my-zsh.sh alias gop='g open' # 加入密钥到 ssh-agent 中 if [ -z "$SSH_AUTH_SOCK" ] ; then eval "$(ssh-agent -s)" fi for key in ~/.ssh/id_*; do # 只加入存在且可读的文件,并排除公钥 if [[ -f "$key" && "$key" != *.pub ]]; then ssh-add -q "$key" 2>/dev/null fi done export PATH="$HOME/.jenv/bin:$PATH" # jenv lazy 加载,首次调用 java/jenv 时初始化 jenv() { unfunction jenv eval "$(command jenv init -)" jenv "$@" } export NVM_DIR=~/.nvm export NVM_NODEJS_ORG_MIRROR=https://npmmirror.com/mirrors/node/ # >>> conda initialize >>> # !! Contents within this block are managed by 'conda init' !! __conda_setup="$('/opt/homebrew/anaconda3/bin/conda' 'shell.zsh' 'hook' 2> /dev/null)" if [ $? -eq 0 ]; then eval "$__conda_setup" else if [ -f "/opt/homebrew/anaconda3/etc/profile.d/conda.sh" ]; then . "/opt/homebrew/anaconda3/etc/profile.d/conda.sh" else export PATH="/opt/homebrew/anaconda3/bin:$PATH" fi fi unset __conda_setup # <<< conda initialize <<< [[ -s "/Users/yolk/.gvm/scripts/gvm" ]] && source "/Users/yolk/.gvm/scripts/gvm" # 设置 Go Modules 的下载代理为国内镜像 export GOPROXY=https://goproxy.cn,direct # 使用 Gvm 进行 Go 的预编译二进制安装包进行安装时,则会使用下面的镜像地址 export GO_BINARY_BASE_URL=https://golang.google.cn/dl/ # 顺便加个别名,方便使用 kubectl 命令 alias k=kubectl # 为别名 k 启用 kubectl 的自动补全功能。__start_kubectl 是 kubectl 自带的补全函数。 complete -o default -F __start_kubectl k # 检查 kubectl 是否在系统里 ($commands[kubectl] 表示是否能找到命令)。 if [[ $commands[kubectl] ]]; then _kubectl_cache="$HOME/.cache/kubectl_completion.zsh" if [[ ! -f "$_kubectl_cache" ]]; then mkdir -p "$(dirname $_kubectl_cache)" kubectl completion zsh > "$_kubectl_cache" fi source "$_kubectl_cache" unset _kubectl_cache fi export PATH="${KREW_ROOT:-$HOME/.krew}/bin:$PATH"
3.Vim 配置
当使用 vim 编辑器时,默认的配置较为简陋,可以在~/.vimrc文件(没有则创建)中添加如下配置来提升 vim 的使用体验:
"********************************基本设置******************************"
set tabstop=4                " 设置tab键的宽度
set shiftwidth=4             " 换行时行间交错使用4个空格
set autoindent               " 自动对齐
set backspace=2              " 设置退格键可用
set shiftwidth=4     		 " 自动缩进4空格
set smartindent              " 智能自动缩进
set number                   " 在每一行最前面显示行号
set showmatch                " 高亮显示对应的括号
set mouse=a                  " 启用鼠标
set ruler                    " 在编辑过程中,在右下角显示光标位置的状态行
set cursorline               " 突出显示当前行
set noswapfile               " 设置无交换区文件"
set writebackup              " 设置无备份文件
set nobackup                 " 设置无备份文件
set autochdir                " 设定文件浏览器目录为当前目录
set laststatus=2             " 开启状态栏信息
set cmdheight=2              " 命令行的高度,默认为1,这里设为2
set autoread                 " 当文件在外部被修改,自动更新该文件
set autoread                 " 自动检测并加载外部对文件的修改
set autowrite                " 自动检测并加载外部对文件的修改
set showcmd                  " 在状态行显示目前所执行的命令,未完成的指令片段亦会显示出来
syntax enable                " 打开语法高亮
set ignorecase               " 搜索时忽略大小写
set smartcase                " 当搜索模式包含大写字母时,搜索区分大小写
set incsearch                " 搜索时逐字显示匹配结果
set hlsearch                 " 搜索时高亮显示匹配结果

if has("gui_running")
    set guioptions+=b        " 显示底部滚动条
    set nowrap               " 设置不自动换行
endif

"********************************设置编码*******************************"
" 设置换行编码
set fileformats=unix,dos,mac
" 设置Vim 内部使用的字符编码方式
set encoding=utf-8
" 设置文件编码
if has("win32")
	set fileencoding=chinese
else
	set fileencoding=utf-8
endif
" 解决consle输出乱码
language messages zh_CN.utf-8